
Your site attracts blind visitors in addition to sharks and their blind plaintiffs, so you should perform screen reader testing on your site.
In 2022 there were more than 3000 lawsuits over website accessibility. If that seems like an enormous number, it is. It’s more than twelve lawsuits on average per working day of the year. That averages closer to two suits per working hour of the year than one.
What’s even more astonishing is that the vast majority of these suits—75% of them—originate from just ten major law firms and a handful of plaintiffs they use to find inaccessible sites. Most of these plantiffs are blind.
We’ve written a fair amount about accessibility in general and some particulars you can tackle to ensure your site meets many of the fundamental accessibility guidelines, but let’s zoom in and consider accessibility for that particular demographic of your audience: the blind. According to the National Federation of the Blind, between 2 and 3 percent of people aged 16 to 75 are blind.
Two percent doesn’t seem like a lot, but if you get a very moderate 1000 visitors to your site a month, that’s likely between twenty and thirty visitors who likely come to your site on a screen reader – a program to read web pages out to their users. Plus, not all screen reader users are blind. According to a WebAIM survey, only 80% of screen reader users self-identified as blind. The other 20% reported just low vision, cognitive challenges, deafness, decreased motor control, or no disability at all. To ensure your site provides a good experience for all those people, you should do some basic screen reader testing.
Who do you get to read your screen?
Contrary to how it sounds, a screen reader isn’t a who, but rather a what. Your screen reader isn’t your little minion that sits next to you and reads out what the web says into your ear. No, a screen reader is a program on your computer, and acts similarly to how Chrome or Firefox work in that they all take the underlying code of a webpage—HTML, CSS, and javascript—and they translate it into something that their users can perceive.
In the case of web browsers, they turn the web into visual text, headings, and images that you see the your browser. Screen readers, being designed for people who can’t see, work in connection with your browser, but then speak out the text, headings, and images from the page.
Responsibilities
You may have never heard of a screen reader until just now, but now that you’ve heard, you should jump into using it feet first! It would be best if you were to have some full-time screen reader users go through your site as well to give you their impressions, but I don’t think even doing that negates your responsibility to go through it on a screen reader yourself.
The experience you have on your site with a screen reader will be significantly different from a full-time user’s experience, but it will at least give you a taste of what it might be like for a visitor on a screen reader, and help you understand more fully the impact some things might have.
If this is your first time on a screen reader, I recommend just using the one built into your computer. On a Windows 10 or 11 machine, this is called Narrator, and on a Mac it’s called VoiceOver. These aren’t the most popular screen readers among screen reader users, which is one reason your experience will be different from a native screen reader user’s, but starting anywhere is better than not starting at all, and using what’s readily available is the easiest way to start.
How to Perform Screen Reader Testing
Good for you for making the decision to experience your site in this new way! I know you’ll find it illuminating and discover significant ways to improve the experience of your site for some members of your audience you’ve maybe not thought a lot about before. To do this, though, you need a systematic approach to screen reader testing. Try our seven steps, and by the time you’re done you may be able to come up with some more steps as well.
Step One: browse sequentially
Your first pass through your site, you should keep it simple. Plan on just arrowing through your site. By this I mean simply use your arrow keys to go from element to element, listening to each one in turn. For now you can skip the navigation, as dealing with menus is a whole different matter that we’ve talked about in Walk the Plank . It’s something you should plan on fixing, if it has problems, but right now we’re focussed on the meat and potatoes of your site.
Once your screen reader is on, use the arrow keys to move through your site element by element. In Narrator, you’ll use the up and down arrow keys, and in VoiceOver, you’ll use the VO combination (hold down Command + Option) and the left and right arrow keys to achieve the same result. You can interact with an element (follow a link, press a button, etc) by hitting enter while on the interactive element. That is how you’ll skip past that site navigation: hit enter when your screen reader gets to one of the first elements, a link that says something like, “Skip to Content”. Hit enter and it’ll jump you past the menu and into the content of the site.

Do this:
- Turn on your screen reader
- Mac: System Preferences > Accessibility > VoiceOver > Enable VoiceOver,
- Windows: Start Menu > Settings > Easy Access > Turn Narrator On, or if hot key enabled, Windows logo key + CTRL + ENTER simultaneously
- Enter the page in your browser.
- Mac: CTRL + OPTION + arrow right several times until it says, “Web Content”, then CTRL + OPTION + SHIFT + down arrow;
- Windows: ALT + TAB to find your Edge browser with your site loaded. You’ll be dropped into the site and Narrator will start reading it.
- Arrow through the page
-
- Mac: CTRL + OPTION + arrow right will take you to and read the next element.
- Windows: down arrow will take you to and read the next element).
Listen to all elements to make sure the screen reader is giving its auditory user the same experience as the browser is giving its visual user.
-
Step Two: browse by headings
Next, navigate the site in several different ways that screen reader users often use, to make sure that your site doesn’t block their ability to do it. Sighted users often glance through the page to decide what they want to focus on by reading through the headings, or looking at the images, charts, links, and such.
Blind people can’t glance around the site to decide where they want to spend their time, but their screen readers can jump them directly to these various elements so they can more quickly get the sense of the page to make a similar decision of where to spend their time.
Navigate the site by headings to make sure that the various sections of the site have indicators of what they’re about. As you’re going through the headings, make sure that the heading levels don’t skip to higher ones, though skips to lower levels are fine.
For example, make a note if one heading has a level of two, and the next one has a level of four or five. Also make a note if there is no heading of level one, or no headings at all. Finally, note anything in the page that looks like a heading, or acts to label parts of the page, but isn’t announced by the screen reader as one.
Do this:
- Windows: type H repeatedly to go through the headings, or Shift + H to go to the previous ones.
- Mac: type Control + Option + U to open the Rotor, the right or left arrow key repeatedly until you find Headings, and then the down and up arrow keys to go through the list of headings. Enter to go to the one you’re previewing.
Step Three: browse by links
Navigate the site by links to make sure that hearing them in isolation gives you enough context to know where they lead. Make a note of anything that doesn’t give enough indication in isolation of where it goes – for example, “read more”, which doesn’t tell you what you’ll be reading more about.
Do this:
- Windows: Type K repeatedly to listen to the links in order, or Shift + K to go backwards.
- Mac: Open the Rotor – Control + Option + U; right or left arrow key repeatedly until you find Links; up or down arrows to move through the list. Enter to jump to the one you’re previewing.
Step Four: browse by form fields
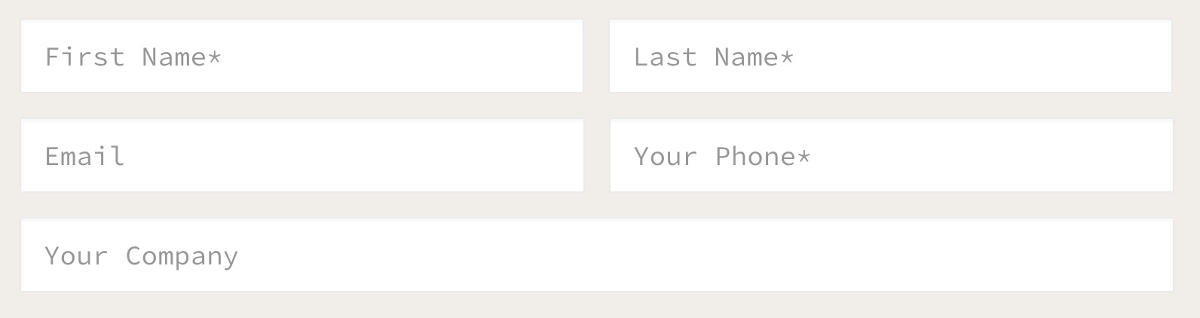
Navigate by form fields and make sure that the fields in the forms tell you what need to be entered. If they don’t, this means that the label is wrong, or not set, and should be fixed. Make a note of this.
Do this:
- Windows: Type F repeatedly to be taken to each of the form fields on the page, or Shift + F to go backwards.
- Mac: Open the Rotor and select the Form Controls option. Consider each item in the list.
Step Five: task completion
Set yourself several tasks to accomplish in the screen reader testing (for example, order a product, or find something out, like contact information or the accessibility statement). If you can’t accomplish the task, make a note of where you get hung up in the process. It’s possible a more experienced screen reader user would be able to make it work, but ideally you want to be sure even novice screen reader users like you can.
Step Six: problem compilation and remediation
Once you’ve found and jotted down some problems with your site that you discovered in your screen reader testing, you need to compile the list in a collaborative format. The best option for this is something like Google Docs, that allows multiple people to access and add to the list. That way you and a few people on your team that you share this post with can go through the site and list any challenges. After you’ve documented those, get your web developer access to the document and request remediation as quickly as they can work it into their schedule.
In addition to fixing the problems, you can ask your agency to update your site’s remediation log, which will go a long way towards showing that you are making a good-faith effort to make sure your site is accessible.
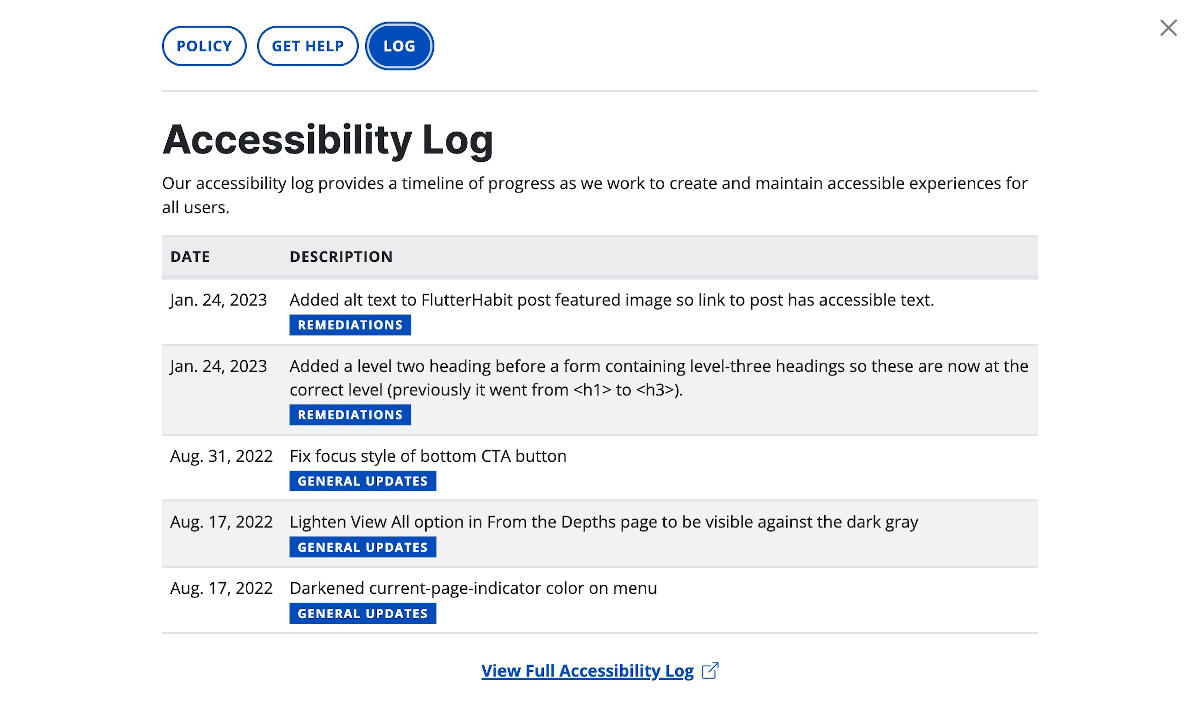
Although just showing your good faith doesn’t mean that your site will never face a legal challenge for the parts of the site that remain inaccessible, doing so will gain you some good faith with your disabled visitors, and strongly signal to the sharks in the water (those 10 law firms that file so many of the year’s 3000+ lawsuits that you’re not an easy, oblivious target who’s never thought about accessibility.
Step Seven: take the credit
Finally, if your business income is less than $1 million annually, and you have fewer than 30 employees, you should apply for the Disabled Access tax credit to get a credit on your business taxes for 50% of the amount you spend doing the right thing for your visitors.
Be great, feel great, get great
You’ll feel great about what you’ve done for your blind visitors, and other coming on screen readers. They’ll feel great about you. The sharks may not feel great about you — they may not send you a letter of commendation — but at least they’re also less likely to send you a demand letter. All of this, and the federal government will decrease your tax liability… That’s great! And all it takes is a little bit of screen reader testing that you can follow our instructions to do. Try it today!
Additional Resources
- Learn and practice your screen reader skills in our Screen Reader Ropes Course.
- See a basic list of Narrator commands.
- See a basic guide for getting started with VoiceOver.
- Read the rest of our series on Accessibility.