
Before you can sell anything on your ecommerce store, you obviously have to set it up with your products. What might not be so obvious are some of the steps to do that most effectively, especially if you’ve never set up an ecommerce store before. While setting your products up may not be as nerve wracking as jumping out of a plane at 30,000 feet, still it should be approached deliberately, and with care. In keeping with the theme of this Big Picture series, let’s get into the weeds of setting up your products, but keep it in the context of the whole you’re trying to achieve.
Prepare for the Drop
The first thing you’ll have to do to set your products up online is import them into your ecommerce platform. The easiest way to do this is by importing a CSV, a comma-seperated-values spreadsheet. Whichever ecommerce platform you choose will have its own format you’ll need to adhere to when setting up your product CSV for importation.
The good news is that wherever you keep your product data now—in your internal inventory software, some other online management system, or even a different ecommerce system—will likely be able to export your products to a CSV document. The bad news is that it’s very unlikely that it will be in the exact format needed to import it into your new ecommerce platform. Not to fear, though! You can take a few simple steps to fix the formatting in the CSV to fit what’s needed.
The biggest challenge you’ll likely face in this process is getting the column headers to match and be in the right order. For example, your current inventory management system may export your products into a CSV with the headers, “Product Title, Body, Tags, Type, Vendor“, whereas Shopify may require it to be in this order: “Handle, Title, Body (HTML), Vendor, Standardized Product Type, Custom Product Type, Tags”. You should be able to download an example product CSV in the products import/export section of your ecommerce platform. Here’s Shopify’s documentation about importing your products file, if you go with them.
Check Your Parachute: make sure your import file’s right
The two files may have headers that represent the equivalent data, but call them slightly different things, and you’ll have to change your old headers to match the new ones. That part should be fairly easy, but getting them in the right order may be a little more tricky. I actually recommend you not change the header names immediately at first.
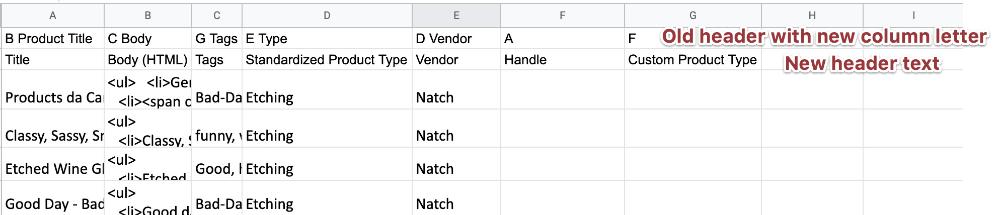
Instead, in your spreadsheet program, insert a row below the header, and put the required header name in the cell below the old one, so you’ve got the new header language below the old one. Next, to the old column headers add the letter of the column the new spreadsheet needs to go in. So now that first row might look like this: B Title, C Body, G Tags, E Type, D Vendor, A, F. Notice the two columns that your old spreadsheet didn’t have have been assigned letters, too.
Next you may need to reorder the columns to fit the required order for import. In many platforms you may just need to get the header text right and the import will sort it all out for you no matter what order your columns are in (Shopify is like this), but others may be finicky, so here’s how you do that in case you need to:
If the order is largely the same between the two spreadsheets, you might get away with just dragging the columns into the right order. It’s really easy to do this in Google Sheets (click on the header letter and drag), and probably easy in whatever spreadsheet software you use (in Excel it takes a shift-click from the edge and drag), but if there are significant changes, or the spreadsheet has a lot of columns (likely), then it’ll probably be easiest to get them all in the right order in a more automatic way.
Code Breaking: rework your data like a pro
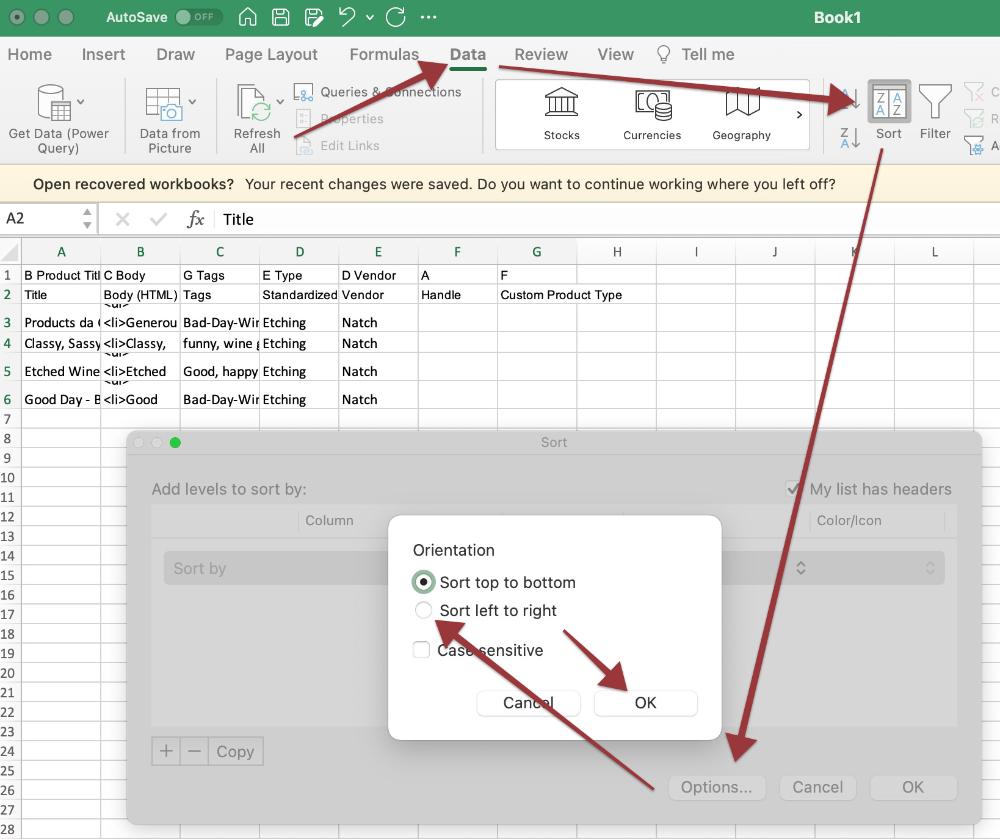
In Excel, the feature you’re looking for is in the Data menu, and the Sort button. Inside that, you’ll need to click the Options button and change the orientation to Sort left to right. Click Okay, and your spreadsheet will now be in the correct order.
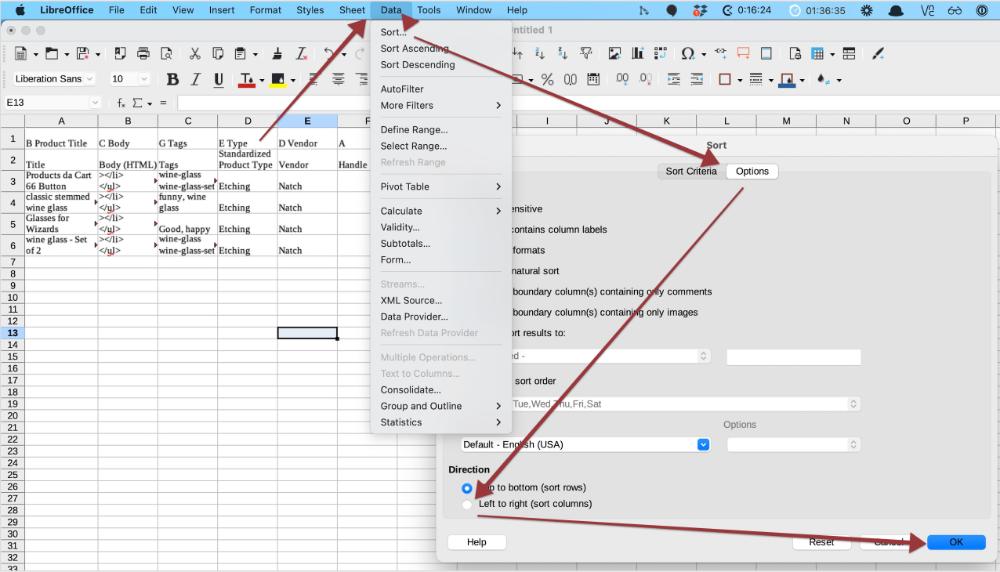
Not all spreadsheet programs will have this option (Google Sheets doesn’t have the ability to sort columns, just rows), but if yours doesn’t, you could install the free LibreOffice suite which does have this feature. In there, you’ll follow this series of steps: Data > Sort > Options > Directions: Left to Right, then > Sort Criteria > Row (Ascending).
With your spreadsheet column header names and order in the proper format, you’re ready to delete the first row (with the old header and column designation), and export your spreadsheet as CSV (Save As > file format = CSV) so that you can import it into your ecommerce platform. Wait a bit for it to import, and then you can check out your products to make sure everything looks right.
Just before the jump: Preparing your Descriptions and Images
Before you import your products, there are a couple areas you’d be wise to spend some time on.
Descriptions
Most of the essential information about your product (price, weight, etc) will come over nicely from your inventory management system, but if you’re migrating your business to ecommerce from a brick and mortar store, you may find that your product descriptions are lacking or nonexistent. In a brick and mortar environment, this is probably okay: your customers can peruse your inventory in person and see what they like, or you’re right there to give them advice.
In ecommerce, though, the product descriptions can make or break the experience for your customers, giving them potentially more information than even the product images do, so you should plan on spending some time writing your own descriptions, or revising any that might be provided to you by the manufacturer.
Manufacturer descriptions are great, but your customers will probably appreciate any time you put in to personalize your descriptions and make them fit your brand and your ecommerce experience. If the manufacturers don’t provide descriptions, or even if they do, we recommend you use the Quick and Dirty Method for content generation, at the end of which your descriptions will glitter with gold, and be more appealing to your customers.
Images
Chances are unless your current inventory management system hosts images of your products (unlikely), there will either be no column for images in the spreadsheet it exports, or it’ll reference images on a server that you may be considering getting rid of. I actually think that’s okay, since in all likelihood the ecommerce platform’s system for putting in product images is fairly easy – probably easier than trying to wrangle the image urls into the right spots on the product spreadsheet.
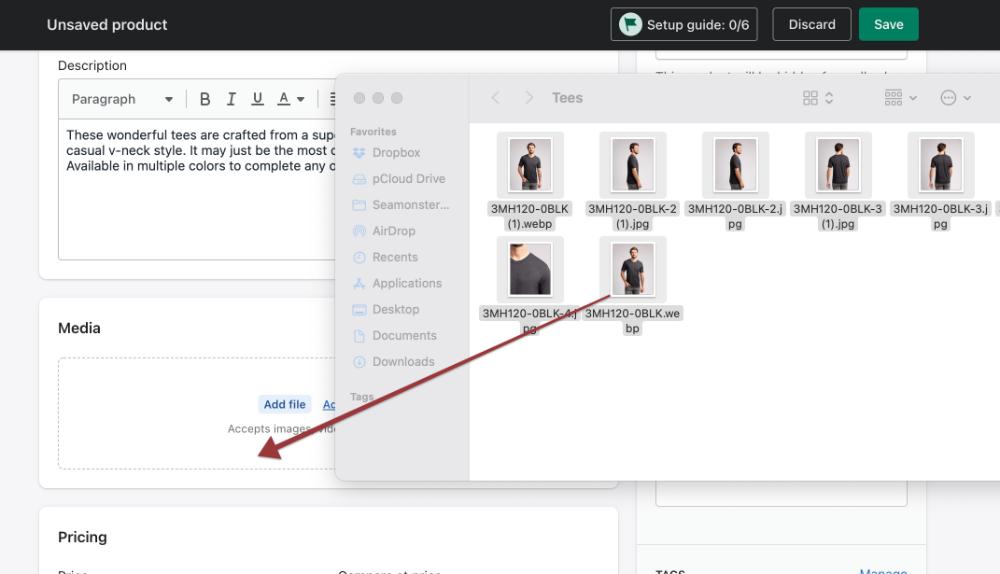
Because of this, I recommend you just deal with images directly on the ecommerce platform. In Shopify, this is as easy as going into each product page and dragging and dropping the images of that product into the image section of the product, and reordering them how you’d like. If you have a significant number of products, this could take a while, but it’s pretty straightforward work, especially if you have your product images organized by product.
Something you may not have considered, when looking at your product images, is that each of them should have alternative text for people navigating your site on screen readers. If you’ve followed our series on accessibility, you’ll know that you’re obligated both legally, and just because it’s the right thing to do, to give all visitors to your site an equivalent experience.
In this case, that means that when providing images to your sighted customers to give them a better sense of the features and aesthetics of your product, you should give your blind visitors a written description of the image to give them a better sense of the features and aesthetics of your product, too.
In Shopify, and probably any other ecommerce platform you choose as well, there will be a place in connection with each image to provide alternative text (or “alt text”). You should fill this with a brief description of what the image represents visually. I said “brief” for these alt text descriptions because some screen readers won’t read more than 125 characters of it anyhow (think about three-quarters as long as a standard text message), so you should keep it under that length.

You’ll want to omit any language like, “image of” and get straight to the meat of it, for example, “charcoal-grey jacket on a grinning red-headed model with black zipper and collar popped up against the cold”, or “close-up of jacket’s cuffs revealing intricate zig-zag stitching”. I said the upper-limit was 125 characters, but the goal is to get the point across rather than fill that limit. You’re just trying to provide the same experience to sightless visitors as you do to sighted ones, so don’t skimp, but try not to be too verbose, too.
Product Pages
After spending the time to get the descriptions right, importing your products, and adding all the images, you’re ready to set up your product pages, where your online store visitors will go to learn about each individual product, and order it. It’s likely that most of how all of this looks will be determined by whatever theme you choose for your ecommerce store, though you may need to decide on a few other aspects of how your store will sell your products.
Before we go into those considerations, though, let’s consider what things you should look at as you go to make your theme selection, taking into consideration particularly how the themes you’re looking at set up the product page. Most themes handle the product page about the same, but you should keep a few things in mind as you’re perusing them.
Utility
 The first thing to keep in mind is utility. Does the theme allow for the presentation of all the information that is most important about your various products? If you sell consumables, is there a good spot to put in the ingredients list, or nutrition information? If you sell apparel, is there a place you can put the dimensions or sizing charts?
Aesthetics
 The second thing to keep in mind is aesthetics. Is the information about the products presented in a beautiful way? Is there plenty of white space, or is it cluttered? Does it look good on both a desktop browser and also a phone browser? Most themes will change layouts appropriately as screen sizes shrink, but some may not, or may have oddities when they do, so make sure you check it out in mobile view as well as desktop.
Accessibility
 The third thing to keep in mind is accessibility. Since you’ll be wanting to ensure that your site is available and easy to use for all, you should take a moment to try to navigate through the theme using only your keyboard’s tab and enter keys. This is really only the most basic thing you can do to ensure accessibility (learn other accessibility issues in our series on accessibility), but it’s a good place to start.
The product page is one of the most important parts of your store to be accessible, and also a pretty common one to have problems. The key processes you want to verify on the product page are the abilities to select the correct variant of a product, add it to the cart, and check out. If you have trouble doing these things with just the keyboard, chances are your visitors that are coming to your site on various assistive devices like screen readers or switch devices would also have trouble on the product page, so you should avoid themes where that’s the case.
Additionals
A couple additional things that may or may not appear on your product pages are subscriptions and reviews.
Subscriptions
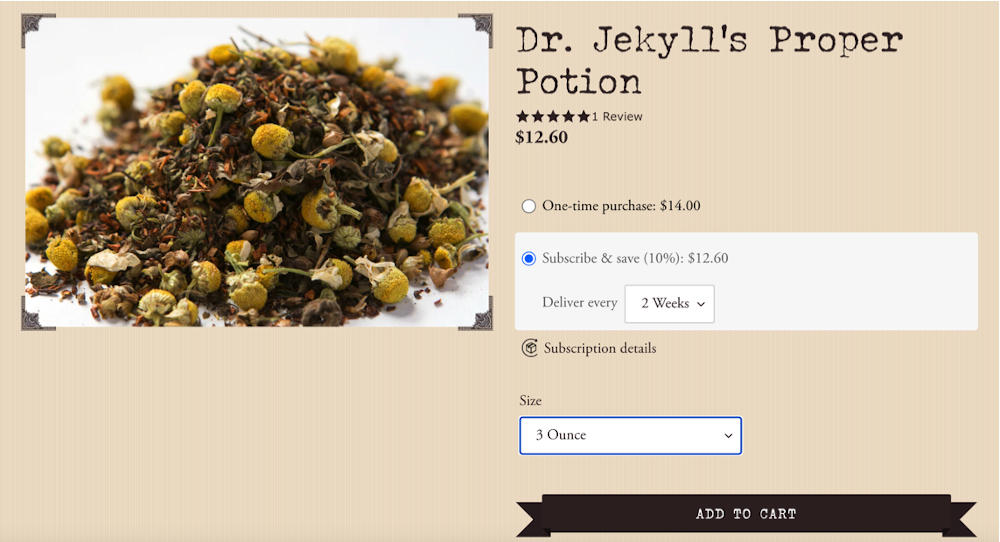
Subscriptions are a wonderful way to gain for yourself hands-off repeat purchases, though there’s a whole bunch of things to think about when considering whether to add them to your offerings or not. You can read here our series about whether subscriptions might be right for you, and how to get started with them.
We’ve helped clients set subscriptions up to be offered on stand-alone pages, as well as directly on the product pages, and both options work, though you’ll likely get higher conversion rates if you do set them up directly in the product pages. Usually you’ll set this up in the subscriptions app you choose, though you may have some choices as to what it’ll look like on your product page. Choose a simple interface and try to make it match the rest of your store as much as you can.
Reviews
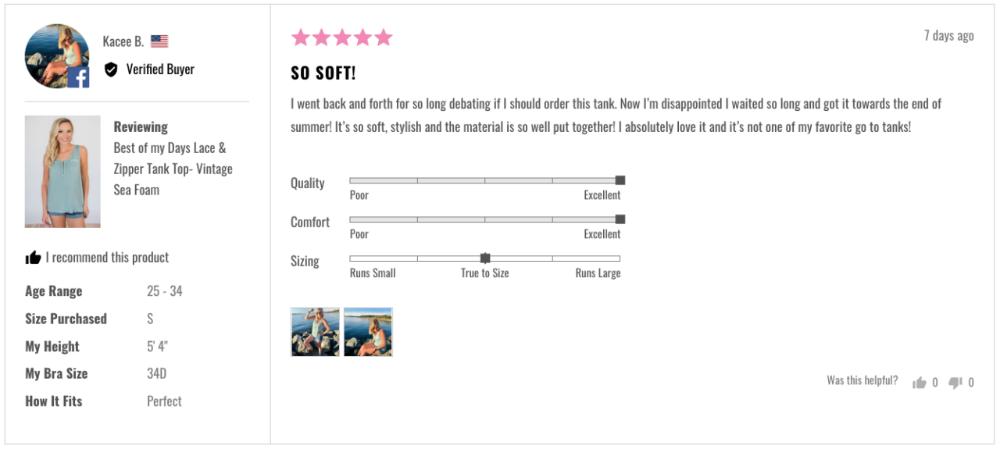
Reviews are another feature that can really add to your product pages. They increase a potential buyer’s confidence in your product and brand, and can provide a great opportunity for upsells, as Lindsay Kolinsky argues in this post on reviews. There are a variety of other considerations with reviews that I intend to explore in a future Big Picture post, so watch out for that, too.
The biggest consideration for reviews in connection with your product page is that they should be well integrated, but not overwhelming. The star of your product page should still be your product itself, and what you have to say about it, though well-put reviews from others can add to that quite convincingly.
30,000-Foot View
Having set up your products and product pages on your ecommerce store, you’re ready to open your doors to the public. You should be flying high! You may still have your brick-and-mortar store to attend to, but now you also have this whole new avenue for your business, open twenty-four hours a day and to people all over the world and in all walks of life and abilities.
Ecommerce does present some unique challenges and opportunities in dealing with your customers, so watch for our future posts on the later stages of the big picture, and what sorts of communication you can and should have with your customers.